Thursday, December 8, 2011

Ruffled Toddler Tee, Tutorial Coming!

I had some friends ask how I made Zoe's Recycled, Ruffled Tee and I originally found the idea on pinterest, but for the life of me can't seem to find the original tutorial. So, I've decided to make my own as well. This week, I have a to make a shirt for my best friends daughter, Riley. I'll get the tutorial up as soon as I'm done with it.

Here are some of the shirts I've made for Zoe thus far.

Not my favorite, I don't like how low the buttons came on this shirt, it made it hard to decide where to make the highest ruffle, and I think it looks awkward.
That said, I LOVE the tie in the back.


Here is our favorite that I've made so far. Love the colors and I love the way the tee fit before I added anything, so it helps.


It works really well for shirts that just need an extra 1-2 inches at the bottom.


Perfect for making shirts last a little longer!

Monday, October 17, 2011

Bo Bunny Et Cetera Projects

If you don't know: now you know: I'm a designer for Lila's Scrapbooking & More in Everett, WA.

I get to play with some of the newer products on the market and make the examples and things for the store.


For my last kit (which was released today in store) I got to work with the Bo Bunny Et Cetera Line.


I love this little box. I instantly knew I was going to do something with it when Adam brought it home from the nut/bolt store!


Come back soon and see what I got to create with the Bo Bunny Sweet Tooth Line. Should be out next week!

Friday, September 16, 2011

Nightstand Re-do

I've had a nightstand for the last few years, I was given it by a neighbor and always had plans for something... but didn't know quite what. After a coat of paint, and a new knob... here it is!


And, here is it in our room....


Today, I finally stopped at the hardware store here in town, and picked up the materials I needed to paint it! Just some paint, and a new knob!


Monday, August 15, 2011

Ruby Rock-It!


As my most recent kit as a designer for Lila's Scrapbooking in Everett, WA-- I chose to take home the Kit from Ruby Rock-It, it had paper from their Le Jardin & Avalon lines, and embellishments from Prima and some doily ribbon from Basic Grey in it.
I used vintage pearls (from an old necklace) as the eggs in the nest. The nest itself is made of white tissue paper, rolled and distress and shaped to the right size and then some jute twine chopped up and glued on.

I chose to use the photos I have of Zoe from the Princess Party she went to for my niece a few weeks back as the basis, the colors went really well! I really love the look of the rolled flowers and decided to use tissue paper for a more delicate look.


Saturday, August 13, 2011

Wednesday, August 10, 2011

{ Love } Wedding Photos

Beautiful Women of the Wedding


The Kids of the Wedding The Men of the Wedding


(from Right, Chris (adams bestfriend) Tyler (adams brother) Dusty (my baby brother) Adam (my husband) Vince (adams cousin) Don (my daddy) Danny (my big brother) I know our wedding was just about 15 months ago; but I stumbled across some beautiful country wedding photos on Pinterest; and thought ours were good inspiration, and hopefully will motivate other brides for a laid back, beautiful wedding!

Thursday, August 4, 2011

{ Navy & Silver Bridal Shower :: Soon-to- Be Bride, Annie }

Photobucket
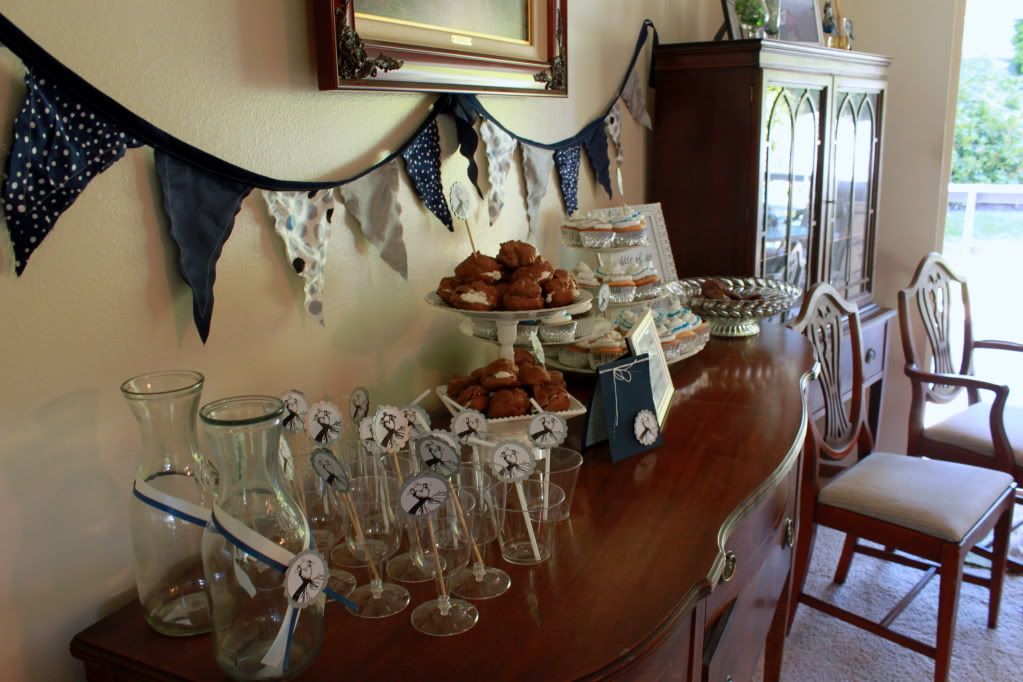
I hosted a bridal shower for my soon to be sister in law; and stuck with the navy & silver theme that their wedding will be. I made all the medallions for decor on toothpicks, straws and carafe 'neckties'.

Photobucket 
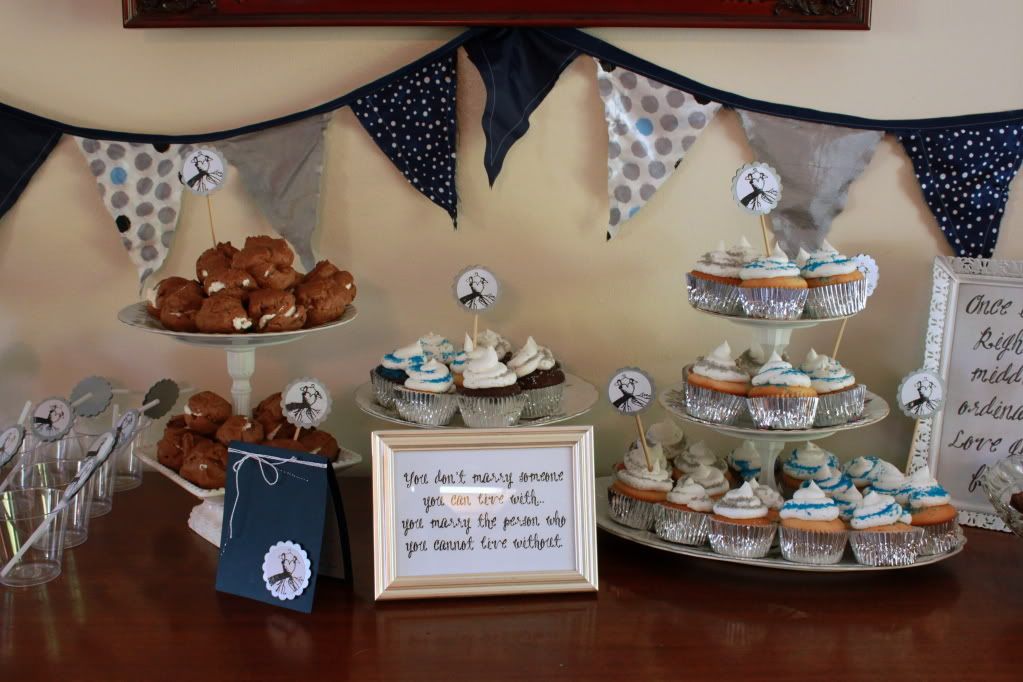
I also made all the cupcake stands; for under $5! I added the bottom (on the right) china dish which was my moms (from her great grandmothers' china) to add more space for cupcakes.

Photobucket
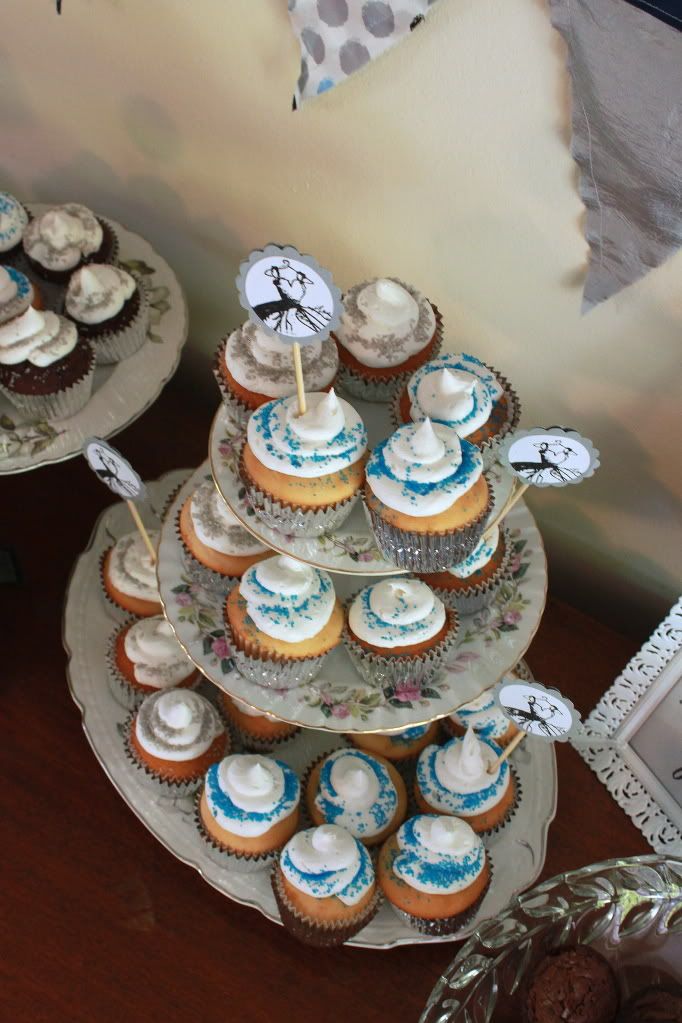
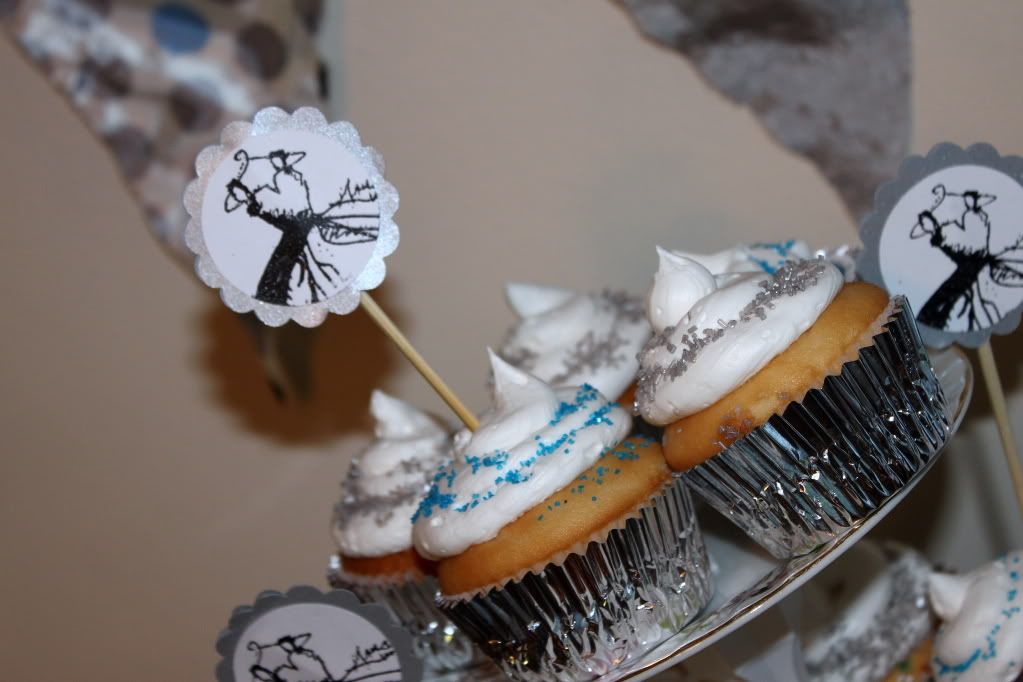
View from the Top of the Cupcake Tower. We did all the cupcakes in Silver Foil wrappers, and frosted then with white buttercream frosting (actually bought by the pound from Albertsons!) and then sprinkled the edges with silver and blue sugar.
Photobucket 
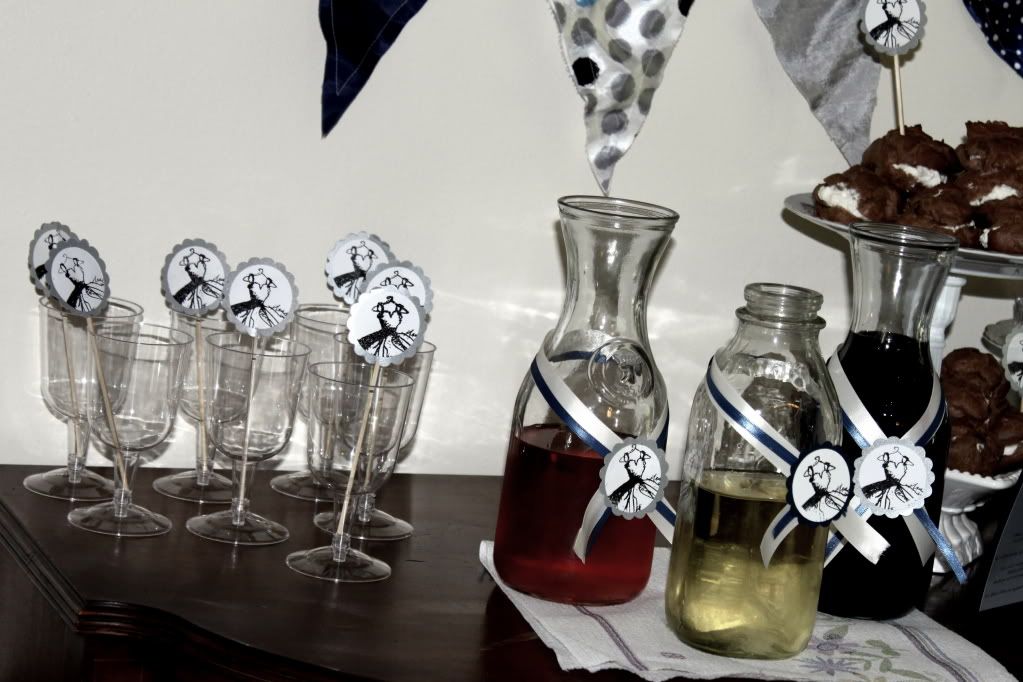
The Wine Carafes were actually .99 cents from Value Village, but they only had two so I also used a vintage milk bottle for the white wine.

Photobucket 
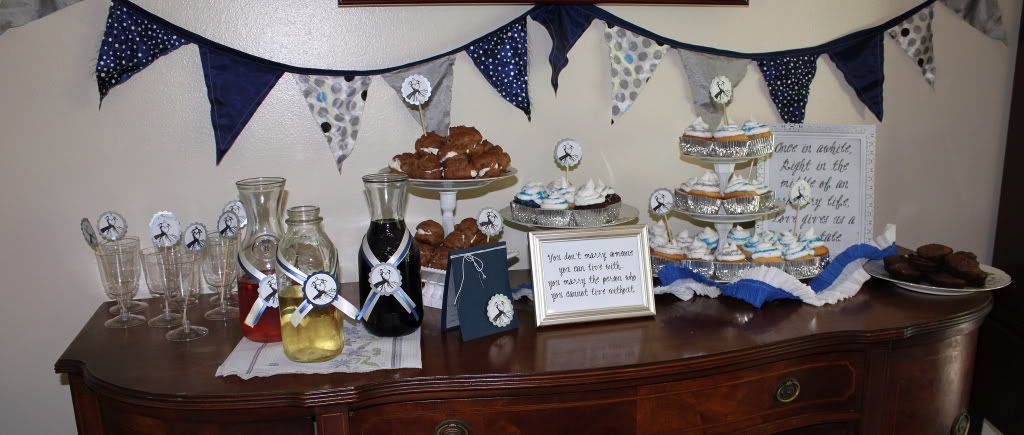
This is the table spread-- I LOVE how it turned out, and only wished I had brought a white linen table cloth to cover my mom's buffet.

Photobucket

Photobucket 
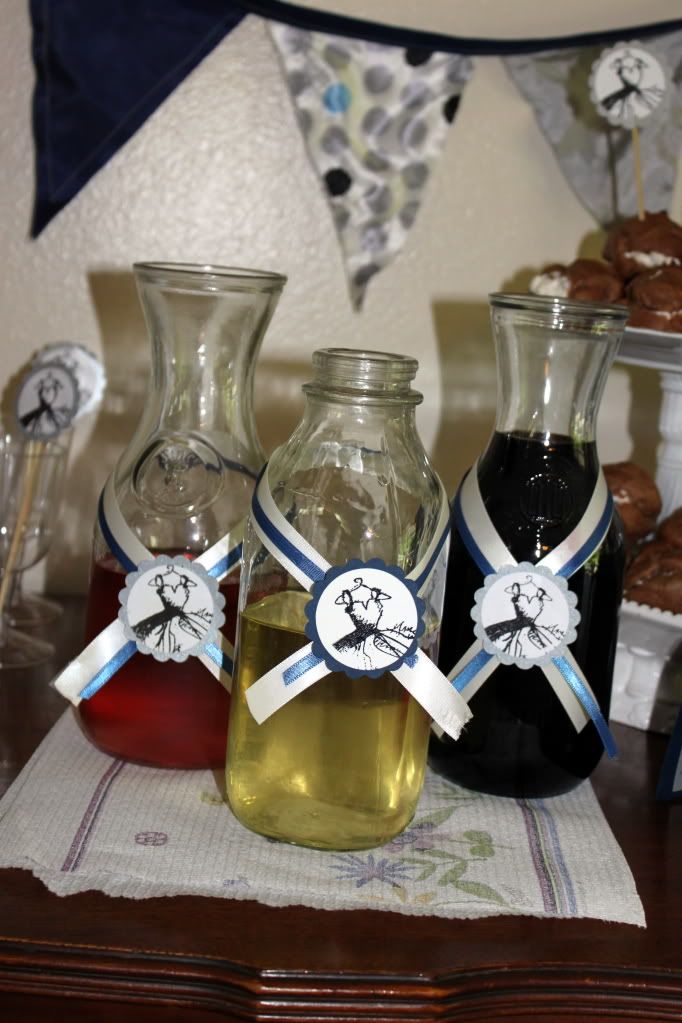
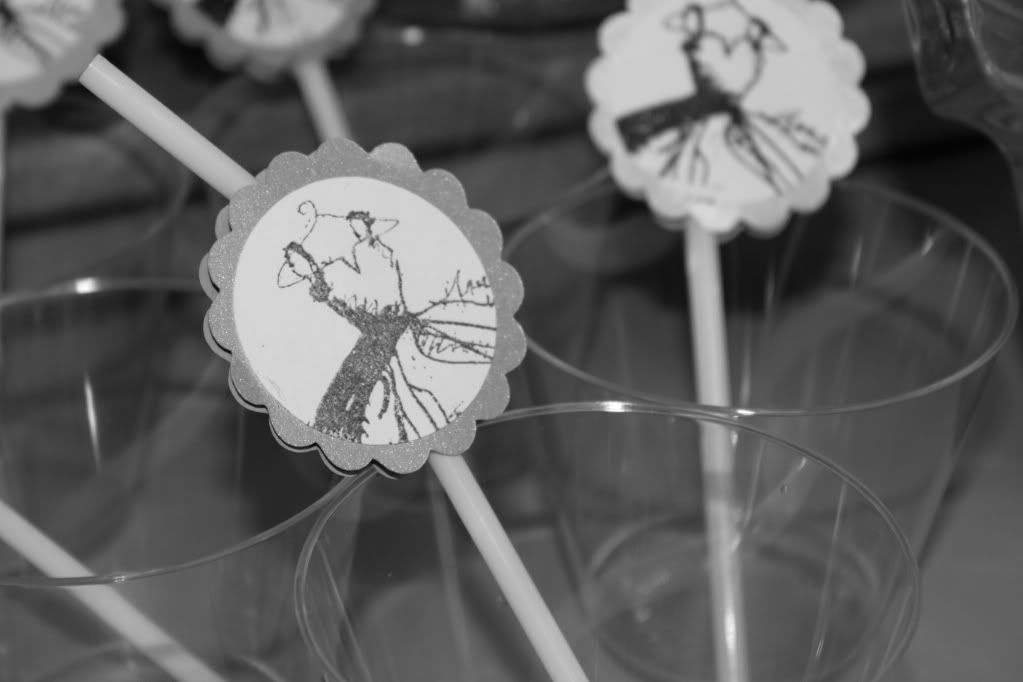
The medallions were silver scalloped circles were cut with my Cricut from Mini Monograms, at roughly 2.28", and the white discs were also cut at the same size. We then stamped the dress image from a stamp I had in black; embossed with clear embossing powder and then adhered together.

Photobucket 
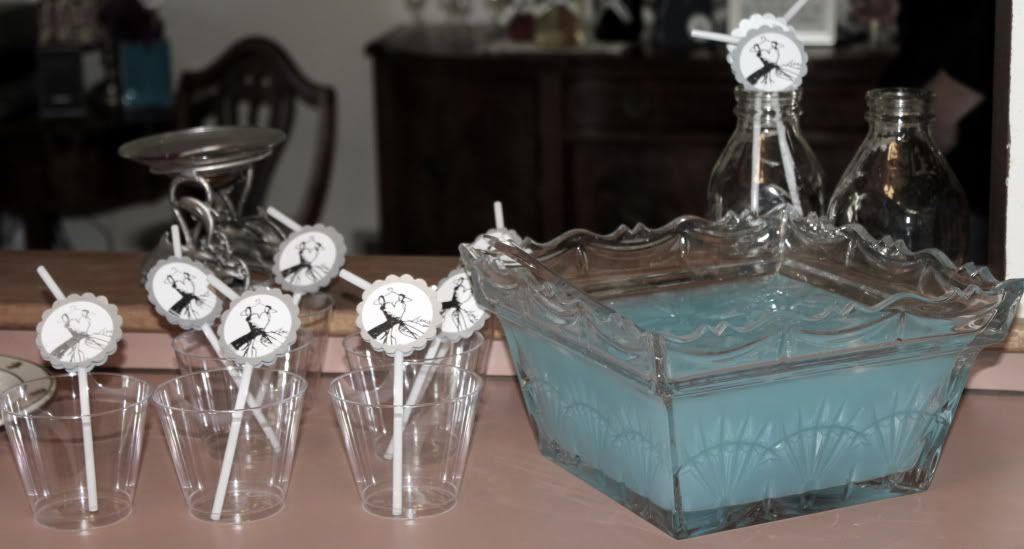
I had planned on making a spiked blue punch, with Blue Curacao and Lemonade; but here in Washington-- there are many city festivals going on, and many of were this weekend (and the weekend before) so the liquor store I went to was sold out of the Curacao. We made instead; a sparkling Kool-Aid. Basically, Blue Lemonaide Kool-Aid, with Sparkling Water instead of plain water.

Photobucket 
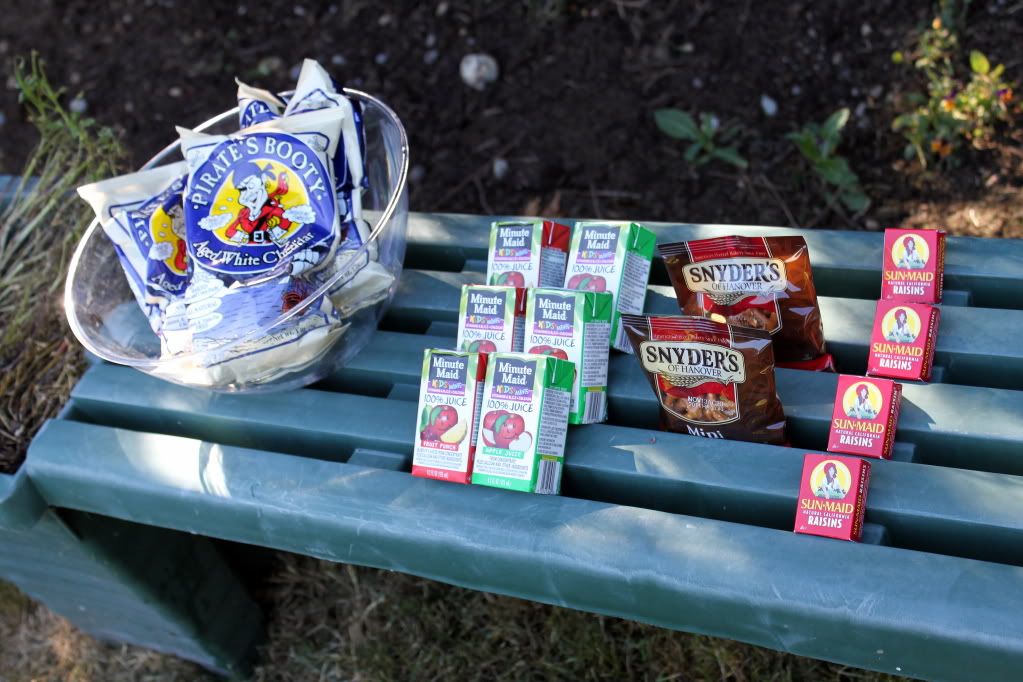
Because I knew we would be having some 'smaller' guests, I set up a kids food area, out in the backyard so they could play and have everything accessible. I found the mini pretzel packs, juice boxes and raisins all at the dollar store; as well as the plastic punch bowl, I had mini bags of Pirates Booty, so this extra little area only cost me about $5!

Photobucket 
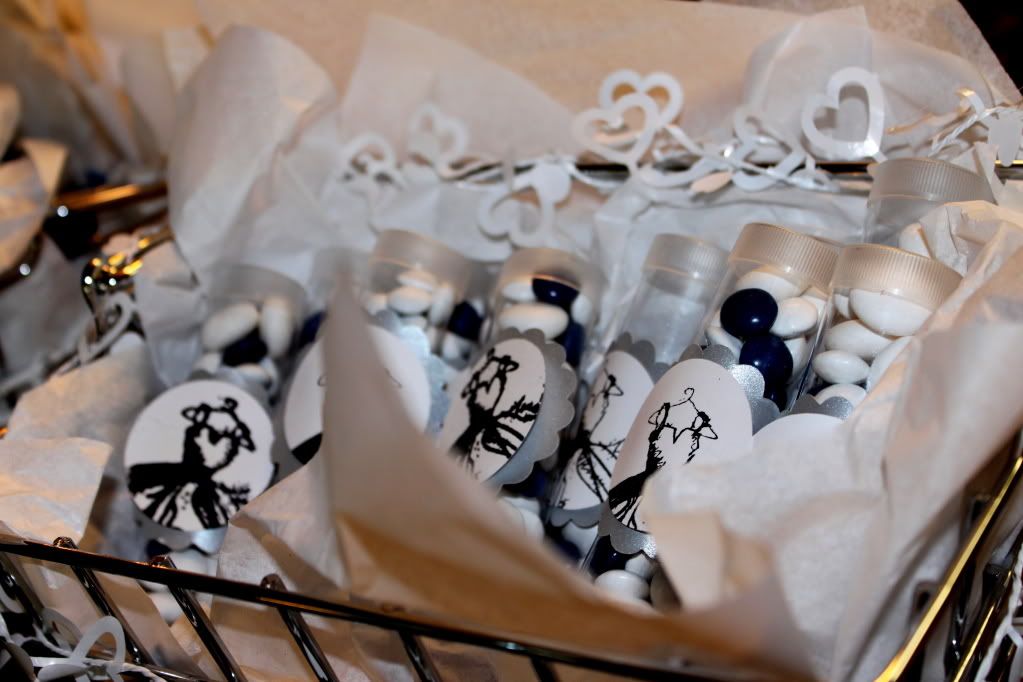
Favors were York Mini Bites (the ones that are like Reeses Pieces Sized) & Mint Mentos in the plastic tubes, that we embellished with themed medallion.

Photobucket 
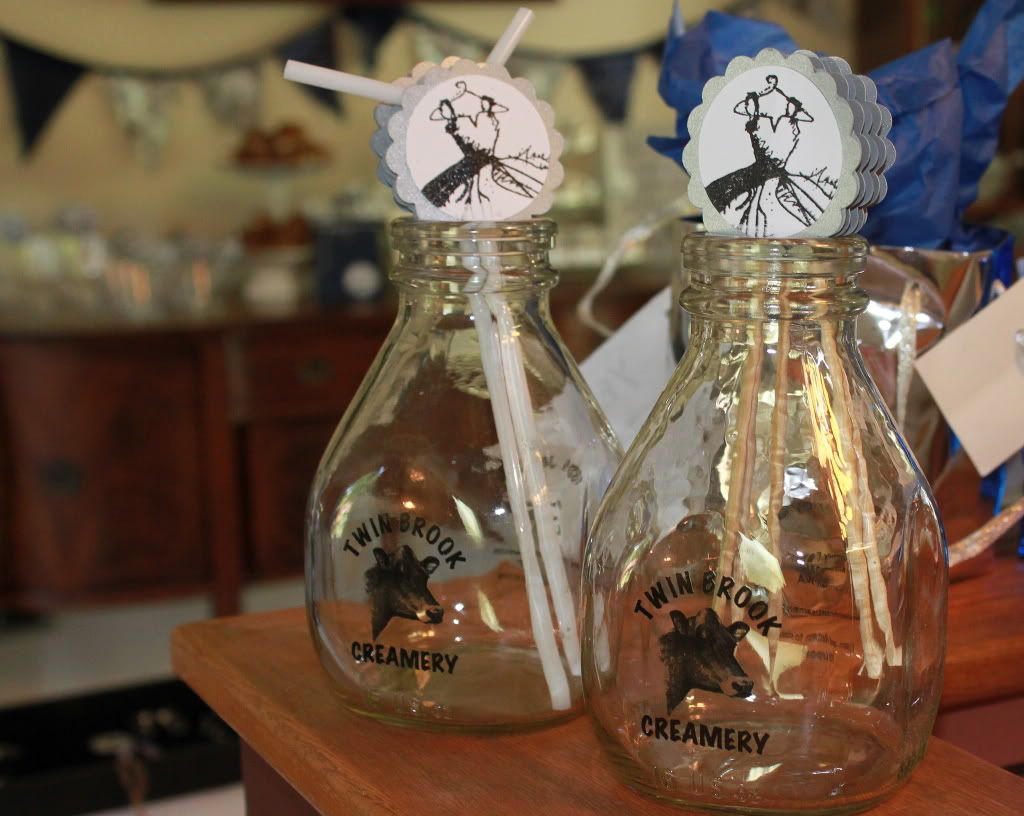
Milk/Creme Glass Bottles were used to hold extra things.

Photobucket 
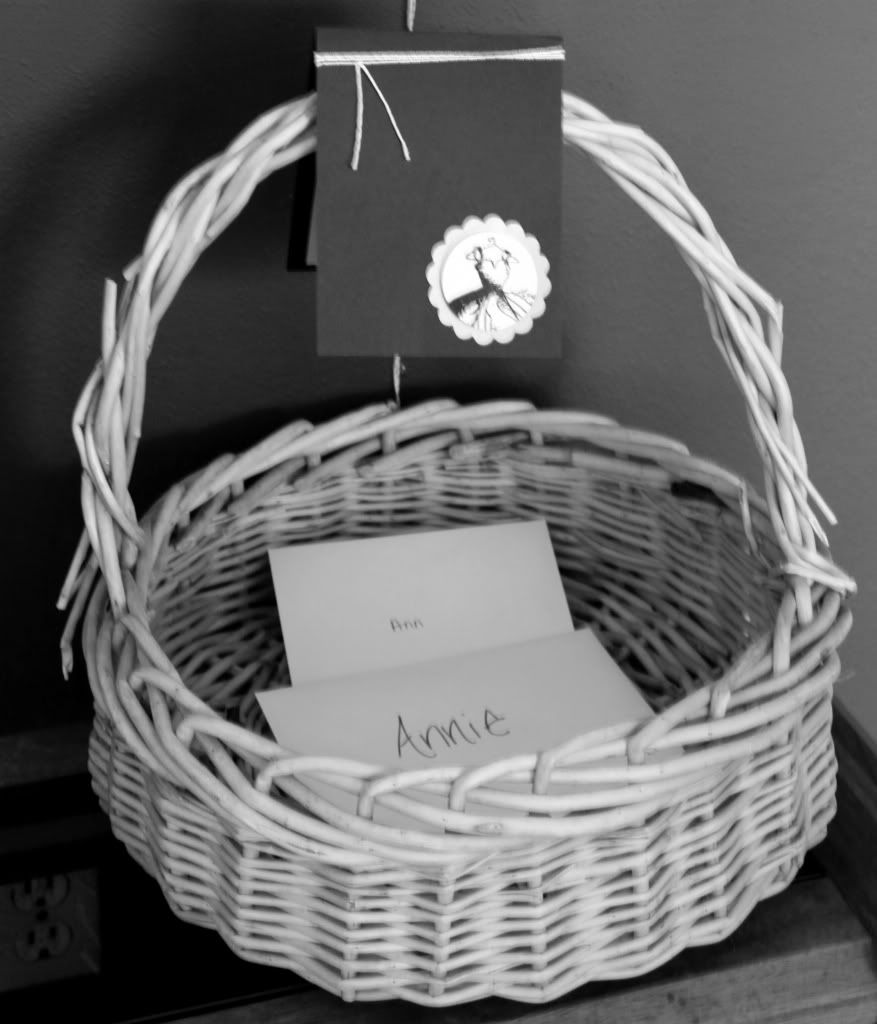
Silly as it looks, I just used a plain basket my mom had on hand, and drapped an invitation over it, for people to deposit their cards into. Easy Peasy!

Photobucket Another Cupcake Close-Up. I am SOOOO happy with how these turned out.

I saw on 
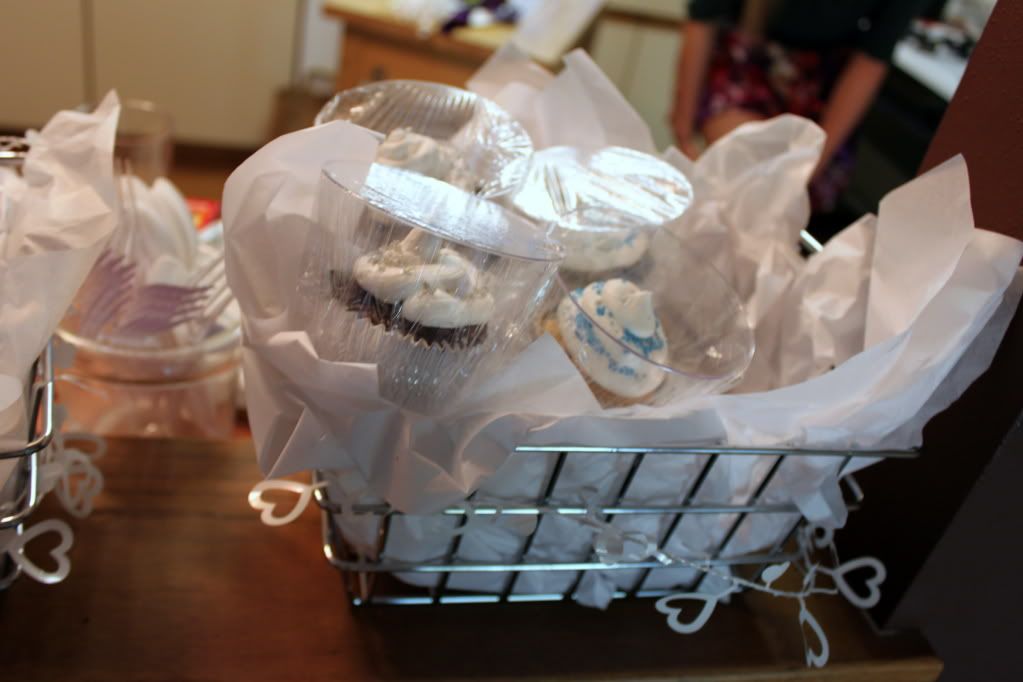
Pinterest, using clear plastic tumblers as cupcake holders, and I chose to package some up ahead of time for people to take home; and the tumblers and plastic wrap do an amazing job at making sure they don't get destroyed on the way home. Photobucket


The Menu:

White Cupcakes w/ White Buttercream Frosting

Chocolate Cupcakes w/ White Buttercream Frosting

Yellow Cupcakes w/ White Buttercream Frosting

Homemade Chocolate Cream Puffs, w/ fresh sweetened whipped cream center

Brownie Bites

Cocktail Sausages in BBQ

(as a 'real' food, since we were serving wine)

Veggie Tray

Fruit Tray


Drinks:

Red Wine

Rose Wine

White Wine

Sparkling Blue Kool-Aid

Water

Soda


Kids Table:

(Everything was in individual servings for ease)

100% Apple Juice

100% Fruit Punch

Pirates Booty

Raisins

Mini Pretzels


Entertainment:


{directions in above link}

Silpada Jewlery Collection Preview by Rhonda Haney

{I'll add the link here to her site, I just can't seem to find it!}


This party was truely a success and I had help from Annie's Sisters; Katie and Sarah as well as my best friend, Steph. Also, I have to say thank you to my mom for giving me a beautiful clean house, picking up the last minute stuff I forgot and letting me use the beautiful china I joked about stealing all day. Also, Tracy; thank you so much for picking up the wine!

Friday, July 22, 2011

Thrift Store Frames, before and after

A very simple project today. I was feeling to urge to spray paint something... I've been spray painting lots lately! So, I swung through the local thrift store to find some frames... I wanted to frame quotes and advice for the upcoming bridal shower, as well as photos of the bride and groom for around my mom's house. This was a great start, and the total cost was until $5!


Frames @ $0.99 each from Value Village


I did about three layers of Matte White Paint (Ace Brand Quick Dry Spray Paint). I just took the backing and glass out, set them on newspaper on the front yard and then let them dry (less than a half hour!) In the smaller one, I printed some wedding/love quote (this one says 'once in a while, right in the middle of life, love gives us a fairytale'.) and added a photo I had matted that would fit in the bigger frame (11X14 matted an 8X10 photo).


LOVE how they turned out, and SOOOO easy!

Chocolate Mousse Cream Puffs

Yes, I know... do I need to say ANYTHING?


Nope!


But, while doing a trial run for the bridal shower I'm throwing at the end of the month, I wanted to make sure I was capable of nailing the cream puffs... Yea, I did...


Recipe:


Chocolate Mousse Cream Puffs

Prep Time: 30 minutes

Start to Finish: 3 hours

Servings: 12 (2 cream puffs each)


Chocolate Mousse

(this needs time to sit and cool, so start with making it!)

4 egg yolks

1/4 C Sugar

1 C Heavy Whipping Cream

1 bag (6oz) Semisweet Chocolate Chips (I used milk chocolate here)

1 & 1/2 C/ Heavy Whipping Cream


Beat yolks in small bowl with electric mixer on high about 3 minutes or until thick and lemon colored. Gradually beat in sugar. Heat 1 Cup Whipping Cream over medium heat just until hot. Gradually stir in half the hot cream to egg yolk micutre, stirring quickly as to not cook the eggs. add remaining hot cream and stir. Cook over low heat, about 5 minutes until it thickens (DO NOT BOIL). Stir in chocolate chips, stir until melted. Cover and refridgerate about 2 hours, stirring occasionally until cold. (start on cream puffs...) but after this is cold, you will beat 1/2 C Cold Heavy Whipping Cream until stiff, then fold in chocolate mixture, put in piping bag, or spoon into cream puffs when they are ready.


Cream Puffs:

3/4 C plus 2 Tbsp Flour

2 Tbsp Baking Cocoa

1 Tbsp Granulated Sugar

1 C Water

1/2 C. Butter or Margarine (I used Margarine and they were just fine!)

4 eggs


Heat oven to 400 degrees F; mix flour, cocoa and sugar in small bowl, set aside. Heat water and butter to a rolling boil in a saucepan. Stir in flour mixture; reduce heat to low and stir vigoriously over low hear about 1 minute or until mixture forms a ball. remove from heat. beat in eggs; all at once, with a spoon. Continue beating until a smooth dough/batter forms. drop by scant 1/4C. about 2" apart on an ungreased cookie sheet. Bake 35-40 minutes or until puffed and golden brown. Cool on a wire rack until cool. Once cool, with a serrated knife, cut off the top third of each puff, pulling out the strands of soft dough on the inside, to make the puff hollow. Pipe or spoon mousse into puffs, replace tops and store in fridge until ready to eat.


Thursday, July 14, 2011

Orange & Creme Wedding Card

My best friend, Steph is going to a wedding this weekend; and the colors for the wedding are Orange and Creme. She asked me to make a card that would go with the wedding colors, and I was thrilled to oblige. Our [original] wedding colors, incase you don't know were also Orange and Brown; but Orange was sort of sidelined when I stumbled upon the girls attire, and boys attire and changed my mind a week or two before the wedding. :-) Our colors ended up being Purple and Green.

Anywhoo, the background paper I used for this card was actually the inside of one of our wedding invitation envelopes, I just cut to size (since our invites were 6X6 I had plenty to work with).


The orange is from PTI-- Cream is from my stash, and the little prima flowers were from last years CK Scrapbooking Convention (which I AM also going to tomorrow!!).


I popped up the cake for some dimension, and I know you can't tell (becuase that was the goal) but I put a piece of cream cardstock under the satin ribbon since you could see the pattern through it.


I also chose to line this card (which I don't do very often) since it is for a wedding, I wanted to make sure the writing inside could be easily read.


I am hoping to post some photos of the CK Scrapbook Expo tomorrow, I'll probably spend some time at Lila's Booth since she is down there also, and I've been saving my pennies since I found so many great deals last year, I didn't want to have to hold back!


Talk with you soon!


Dawn

Friday, July 1, 2011

Keepin' the Kiddos Busy... for three months?!!?


Since Zoe is only 3 (and a half; she would tell you) she isn't in school yet; and actually she doesn't go to daycare of any sort of 'away from mommy' care. She is with me; basically all the time at either our home, or my work (which is actually sort of like daycare since she hangs with her uncles in the shop or on the paintball field [when it's NOT open] and plays or watches toonies, or cleans cabinets, etc.)


We came home from work early today; because I couldn't resist a day like this:


Which is Washington, translates to this:


Nothing stellar and hot, but comfortable, warm and DRY!


Anyways, we've been trying to figure out things to do outside, because we're stuck in the house so often in this part of the country. I know I won't melt if we go for a walk in the rain, but you'd like Adam and Zoe would.... maybe it's him being raised in the midwest... or her believing this antics. We have lots of slugs and snails at our house, and they come out moreso when it's cool and damp, so our city's slug population has dramatically decreased in the last two weeks and we've probably gone through 10 pounds of salt killing them... but she has fun hunting them... and I can't help but do an evil laugh knowing they aren't going to eat my strawberries again anytime soon!


Over at Lauren's Creative today, she posted some cool projects she did with her daughter, who is about the same age as Zoe. This tells me, it's do-able with Zoe and if she eats it, she isn't going to get sick. :-)


Sidewalk 'Chalk' paint was as big of a hit in my house as it was in hers! How cool it was to 'splatter paint' the from patio, and draw, color and write with it!


Oh, and making this mix is totally a mommy job, because with little hands helping, I ended up with a pink hand... and it doesn't just wash off! Darn food coloring!


And, no matter how careful we tried to be, she was bound to splatter herself too, so the Uggs (costco, baby!) she was wearing are splattered too, so I'm hoping I can wipe it off and the color want stain the suede...